


Back in February, I got put in charge of the Valentine’s Day party craft for my son’s preschool class. I found this really neat suncatcher craft using Mod Podge and tissue paper. Maybe it’s just me, but the phrases Mod Podge and class of preschoolers didn’t jive. So, I put on my thinking cap and came up with a version that is totally mess-free and toddler proof!
The best thing about this craft is that you can adapt it for any season or holiday by changing the colors of the tissue paper and/or adding other small pieces. As I mentioned, we used it for Valentine’s Day first. Then, I had my kids make some for their grandmas for Mother’s Day. The second time, we added a fun new medium to make it extra special. (And my son went a step further to really add something way extra special…I’ll share that later.)
Materials
- scissors
- pen/marker
- clear contact paper
- tissue paper in a variety of colors
- small dried flowers (optional)
- construction or cardstock paper
- scotch tape
- string (optional)
Directions
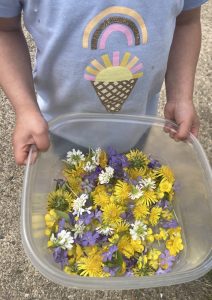
ONE: Optional step: Gather small flowers and dry them. We laid ours between two pieces of paper towel and stuck them in the center of a thick book. It will take a few days for them to be dried and usable. You can also microwave them if you need to speed up the process. Again, this is not a necessary step, you can instead use tissue paper for the whole project.
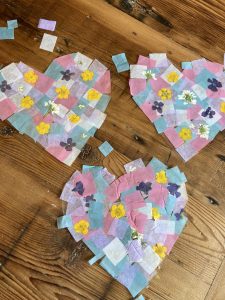
TWO: Draw a shape onto the contact paper. We made hearts for both Valentine’s Day and Mother’s Day. You could use eggs for Easter, pumpkins for fall, trees for Christmas, etc. I drew the shape on construction paper first so I had a template. Then I traced it onto the contact paper. This step isn’t necessary, I just wanted them all to be the same.

THREE: Cut the shapes out. Then, cut small pieces of tissue paper. I did little squares, but they certainly weren’t perfect. I layered multiple pieces of tissue paper and just made quick snips. You want at least 2-3 different colors of tissue paper. For Valentine’s Day, we did white, red, and two shades of pink. For Mother’s Day/spring, we did light purple, pink, light blue, and white. Like I said above, you can do this craft for any season or holiday just by changing the colors of tissue paper you use. If you’re on a budget, keep in mind you can get tissue paper at dollar stores. Or, if you’re like me, you’ve got bunches of it saved from gifts you’ve received. I told my husband that would come in handy some day!
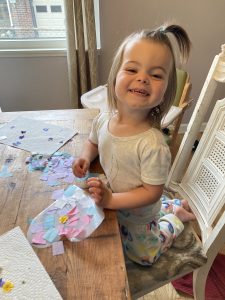
FOUR: Peel the backing off of the contact paper and lay it on a table sticky side up. Let your child go to town covering the shape with all of the tissue paper- and flowers if you are using them. Keep in mind that the sun shines through the tissue paper, but won’t shine through flowers or other objects. So, we used those sparingly and still covered most of it with tissue paper.
You want to cover the whole shape, but try not to pile it on. The sun will shine through better if you don’t put thick globs of tissue paper on it.
Hopefully your child won’t be like mine and add in his own special object to the project as well. My 4-year-old decided it was a great time to cut his own hair. I didn’t realize he had done it until I looked down at his project and saw tiny pieces of hair all over it. So yeah…that was an extra special addition to these Mother’s Day hearts. Totally optional though!

FIVE: You could just trim the excess tissue paper along the edges of the shape and leave it like that. Or, you can make a frame for the outside like we did. This step took a couple of tries before I got it right. I used my original shape template and traced a little outside the line and then a little inside the line to make a frame. We then placed the frame on the front of the completed shape and used scotch tape to secure it on the back.
SIX: Optional step: You can slide a piece of string between the shape and the frame and tie it around the frame. This will give you a way to hang it in the window. We did this with the Valentine ones, but we ended up just taping the spring suncatchers right to the window.
SEVEN: Hang it in a window that gets full sun and enjoy your suncatcher!
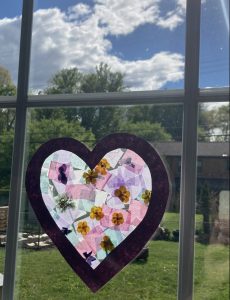
When you’re all done, the only clean up is sweeping all of the extra pieces into the trash. Easy peasy! We’ve now made this craft multiple times and my kids have loved it each time. The prep is easy and I’ve got plenty of contact paper left, so we’ll definitely try new shapes and colors again in the future. They add a bright and cheery touch to any window. I hope your children enjoy it as much as mine!


